
Shading in wrinkles/folds by Makk
When shading its important what colours you chose for your highlights and shadows. Try choosing a dark, almost black, tone of your base colour for the shadows. For highlights choose an almost white, but NOT white, tone of your base colour. Here is what I'm using for this tutorial-
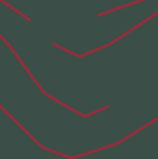
Ok when starting its important to have an idea of where abouts you want the wrinkles to be. For this tutorial, I have made a few lines to show you where I want to place my wrinkles-
(Of course you don't have to do this, you can just keep it all in your head)
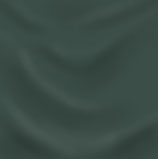
Now then, grab the airbrush and make sure you set the pressure/opacity to anywhere between 1% - 4%. The reason for this is so we can build up the shading (Starting lightly, then the more we go over it, the brighter/darker it becomes). Now its time to start laying in those shadows with your shadow colour that you chose before-

See how I'm following the lines that I made before. You can start to see the wrinkles coming out.
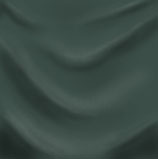
Now its time to put in a few highlights, so with your airbrush (same settings) make sure you have selected your highlights colour.
Start to place a few highlights above the shadows, like so-
See how its starting to come together, but wait! there is still more!
Its time to sharpen up the shadows. With your airbrush and shadow colour selected, chose a smaller brush then you used for the shadows. Now start to shade just below the highlights. Like in between the highlights and the shadows, like so-

I do this because it helps to sharpen the wrinkles, so they stand out more.
Now we do the same again, this time with the highlight colour and shading just above the shadows we did in the previous step-
And we are done!! It certainly isn't perfect, but its a start! With more practice you can get better and better!
Using this technique/method, you can apply it to create wrinkles on all your skins. Have fun.
Makk