This tutorial is intended to give you some idea as to how to go about painting hair to your faces. This method is by no means the only way, it may not even be the best way but its the way I do it. You may find that your methods work out better for you, if so then keep using your way. Also don't expect to be able to do it perfectly straight off, it takes time and practice to get it to look right.
-----------------------------------------------------------
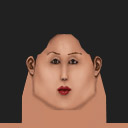
First decide what head mesh you want to use and what you want the face to look like.
Once you've decided on that, open up your paint program and load up the face that you want to use a base.
Next, using the select tool (or lasso tool) select the area where you want the hair to be and fill it in with a relatively dark version of the colour you want the hair to be.
This is how mine is looking so far-
Next select a lighter version of the colour you want the hair to be. Once you've got that, get out the airbrush tool and choose a 1 pixel brush and 100% opacity/pressure.
Using the airbrush make some strokes in the direction you want it to fall (generally you start near the top of the head in the middle, and go down to the bottom).

Keep adding hair until its done
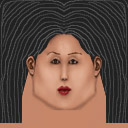
You will notice that I've actually only done one side of the hair and just mirrored it on the other side. This is a quicker way (since I'm making this for this tutorial and not for the game) but it looks better if you do both sides instead (It wont look so symmetrical).
Once that part is finished get out the smudge tool. Make sure that you select a brush size that's fairly big (I used a size 20 brush) and check the opacity/pressure to around 70-80.
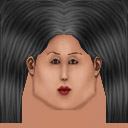
Just like you did with the airbrush, with the smudge tool go in the same direction (where you wanted the hair before)
Once that's completed it should be looking something like this-
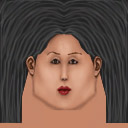
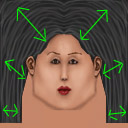
Getting there, but its not quite realistic enough. Grab the dodge tool (if your paint program doesn't have one, choose a white colour and make sure the airbrush is on a low opacity setting, about 5%) with the opacity set to about 30% (Photoshop users should set the dodge tool to "Highlights") and a brush size about 30 (no smaller then 20). Now this bit is a little tricky to explain, basically where going to add highlights to the hair. This gives it a more realistic look (and it looks like healthy hair, not straw!)
See on the image below, the arrows are where you should place these highlights, start from the inside and go out
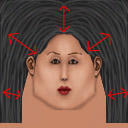
Now once you've done the highlights, its time to do the opposite and add darker areas!
Grab the burn tool (If your paint program doesn't have one, choose a black colour and set the airbrush to about 5%-10%) and using the same sized brush and opacity/pressure, darken the areas between the highlights you did just before.
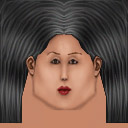
Right once that's finished it should look something like this-
Nearly done but, it can look a bit better. If your paint program has a sharpen tool, select that. Choose a big brush, around 40-50 and set the opacity to about 30%. Now using some quick strokes (If you hold it down then it goes too sharp) go over the hair. You should notice that the hair has become slightly more defined and isn't so "smudgey"
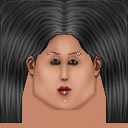
If all went well then it should look like this-
Now that's all done!
All that's left is to add some details to the face, tweak the hair if necessary and badda bing, badda boom, bidda BANG!! finished
I hope this has been some help to you. Remember practice makes perfect!......Ooh and have fun too :)